Friday, December 23, 2011

The Iterator Pattern

It doesn't take long in one's c# education before one discovers the 'foreach' loop. What they may not know is that this is actually the Iterator pattern built into the language through the IEnumerator and IEnumerable interfaces.
In this article I'll go over the pattern and show you how to build an iterator from scratch. While you may never implement this exact pattern in any of your projects it's good to know how it's done and will hopefully help you understand how to extend the built-in iteration system within the c# language.
Ignoring our 'foreach' capabilities for the moment let's see what the problem is.
//Here's a simple class that can be kept in
//some sort of collection.  We don't know what kind of
//collection but we'd like to go through each Item and 
//print out the description.
class Item
{
    string _description;

    public string Description
    {
        get { return _description; }
    }

    public Item(string description)
    {
        _description = description;
    }
}

class Program
{
    static void Main(string[] args)
    {
        List<Item> itemList = new List<Item>();
        
        int maxArraySize = 3;
        Item[] itemArray = new Item[3];
        
        //populate the collections.
        for (int i = 0; i < maxArraySize; i++)
        {
            Item ithItem = new Item("Item" + i.ToString());

            itemArray[i] = ithItem;
            itemList.Add(ithItem);
        }
        
        //Iterate over the List...
        for (int i = 0; i < itemList.Count; i++)
        {
            Console.WriteLine(itemList[i].Description);
        }
        
        //Iterate over the Array...
        for (int = 0; i < itemArray.Length; i++)
        {
            Console.WriteLine(itemArray[i].Description);
        }
    }
}

Again, temporarily forgetting about the 'foreach' loop (we'll get to it), this is a mess with no obvious solution. For every type of collection we have we'd need to loop over it in a different way. The List has a Length property while arrays have a Count property and there's no telling how some other collection may be looped through.
Let's make a simple Store interface to help illustrate. Some stores may want use Arrays, and some may want to use Lists or any other type of collection at all, but they all need to be able to print out the description of their inventory. A Store can be thought of here as an Item collection.
interface IStore
{
    void PrintInventory();
}

public class ListStore : IStore
{
    List<Item> _inventory;

    public ListStore()
    {
        _inventory.Add(new Item("Soap"));
        _inventory.Add(new Item("Fan"));
        _inventory.Add(new Item("Fish Tank"));
    }

    public void PrintInventory()
    {
        //Here's the problem...
        for (int i = 0; i = _inventory.Count; i++)
        {
            Console.WriteLine(_inventory[i].Description);
        }
    }
}

public class ArrayStore : IStore
{
    const int maxSize = 3;
    Item[] _inventory;

    public ListStore()
    {
        _inventory = new Item[maxSize];

        _inventory[0] = new Item("Shoes");
        _inventory[1] = new Item("Duct Tape");
        _inventory[2] = new Item("Venti Cappuccino");
    }

    public void PrintInventory()
    {
        //Here's the problem...
        //Duplicating code at all or with slight differences
        //should make your refactoring senses tingle!
        for (int i = 0; i = itemList.Count; i++)
        {
            Console.WriteLine(itemList[i].Description);
        }

    }
}
What's changing here is the particulars of the iteration. We'd like to encapsulate iteration and the Iterator pattern does just that by introducing an Iterator interface that will allow us to control how we loop through any collection in any way we want.
It's not too tricky so let's take a look.
interface IIterator
{
    //This will tell us if there is a
    //next element in a collection...
    bool HasNext();

    //And this will return the next element.
    object Next();
}

//Let's see how these iterators are implemented.
//first for a List...
class ListIterator : IIterator
{
    List<Item> _items;

    //_position keeps track of where we
    //are in the iteration of the list.
    int _position = 0;

    public ListIterator(List<Item> items)
    {
        _items = items;
    }

    public object Next()
    {
        Item item = _items[_position];
        _position++;
        return item;
    }

    public bool HasNext()
    {
        if (_position >= items.Count)
        {
            return false;
        }
        else
        {
            return true;
        }
    }
}

//And now for the array...
class ArrayIterator : IIterator
{
    Item[] _items;
    int _position = 0;

    public ListIterator(Item[] items)
    {
        _items = items;
    }

    public object Next()
    {
        Item item = _items[_position];

        //Increment our position...
        _position++;
        return item;
    }

    public bool HasNext()
    {
        if (_position >= items.Length)
        {
            return false;
        }
        else
        {
            return true;
        }
    }
}
Now we need to make some small changes to the Store interface...
interface IStore
{
    //All we need is a method to retrieve
    //the appropriate iterator.
    IIterator GetIterator();
}

public class ListStore : IStore
{
    List<Item> _inventory;

    public ListStore()
    {
        _inventory.Add(new Item("Soap"));
        _inventory.Add(new Item("Fan"));
        _inventory.Add(new Item("Fish Tank"));
    }

    public void GetIterator()
    {
        //this iterator is passed a list item
        //to loop through.
        return new ListIterator(_list);
    }
}

public class ArrayStore : IStore
{
    const int maxSize = 3;
    Item[] _inventory;

    public ListStore()
    {
        _inventory = new Item[maxSize];

        _inventory[0] = new Item("Shoes");
        _inventory[1] = new Item("Duct Tape");
        _inventory[2] = new Item("Venti Cappuccino");
    }

    public void GetIterator()
    {
        return new ArrayIterator(_inventory);
    }
}
Now we can loop through each element in a collection regardless of the type, as long as the class associated with the collection returns the correct Iterator type.
Let's see this in action.
class Program
{
    static void Main(string[] args)
    {
        IStore listStore = new ListStore();
        IStore arrayStore = new ArrayStore();
        
        IIterator listStoreIterator = listStore.GetIterator();
        IIterator arrayStoreIterator = arrayStore.GetIterator();
        
        //Now it doesn't matter what type of
        //collection our stores use in their implementation
        //as long as they know their iterator!   
        PrintInventory(listStoreIterator);
        PrintInventory(arrayStoreIterator);
    }

    //we could have also kept this in the store class and
    //done the iteration internally.
    void PrintInventory(IIterator iterator)
    {
        while (iterator.HasNext())
        {
            Item storeItem = (Item)iterator.Next();
            Console.WriteLine(storeItem.Description);
        }
    }
}
This is, as I may have mentioned before, a very simplified example with a simple version of the pattern and is not the only way to implement this or any pattern. Just for one example we could have used generics in the iterator's Next() method to return an exact type instead of an object type.
We could iterate through a collection in any way as well: backwards, skipping every other one or anything, really.
This is basically what c# uses when you use a foreach loop, except they use an IEnumerator interface instead of our Iterator and the IEnumerable interface for returning the appropriate iterator or enumerator, ie. the GetIterator() method in our IStore interface. The actual 'foreach' keyword is syntactic sugar for making the code easier to read or write but is basically using something like our while loop.
In actual c# programming you'll never actually need to make an iterator from scratch since there's such a nice one built in with such simple syntax, but I thought it might be illuminating to see how it's actually done.
Because this is an article about design patterns and not about all the neat features of c# I won't go into how to extend IEnumerable or IEnumerator here but here are some links for doing just that.

Further reading:

MSDN.com
codebetter.com
this article shows us how to code the same behavior without using a seperate iterator interface, the iteration is done in the collection class using the yield keyword.

Tuesday, December 13, 2011

The Composite Pattern

The Composite pattern defines a tree structure. A tree structure is a hierarchical composition of nodes, kind of a nested collection; a node can be composed of other nodes or not. Nodes that contain other nodes are called parent-nodes while the nodes they contain are not surprisingly called child-nodes. Some nodes are not or cannot be a parent to other nodes. These are called leaf-nodes. One benefit of the Composite pattern is that we can treat the entire tree, a branch (or sub-tree), or a single node equally since they're all the same data type, ie. nodes.
Graphically, the structure resembles a tree hence the name.


An obvious example would the be folders or directories on your hard drive, which can contain other folders, which can contain others and so on. Files would be our leaf-nodes since they cannot contain further folders. While searching for a file, your computer visits each folder and each file within each folder in a certain order until the desired file is found. The process of visiting each node is called tree traversal.
There are many uses for tree structures ranging from collision detection to list sorting algorithms.
In this article we will use the Composite pattern to set up a tree structure and learn how to traverse it in different ways.
Let's take a quick look at the class diagram.

As you can see, the Node which defines the interface that our client class will be working with contains methods for adding, removing and retrieving nodes. A leaf-node cannot contain other nodes but must still inherit from the Node interface so these methods are superfluous, moreover, there may be methods or properties that apply only to a leaf node and not a component node. While this does break the "one class, one responsibility" paradigm, we get the benefit of being able to treat every part of the tree the same: as a Node. This can make for somewhat dangerous code if the client tries accessing something that does not apply to the object but there are ways to handle it and the ability to treat each part of the tree uniformly can be worth the added overhead.
For our example we'll build a mock folder tree with "folders" and "files". The folders will have a name and be able to contain either other folders or files. The files will have a name and a "description" string field but will be unable to contain other nodes. Likewise, our folders will have no description field.
//The interface all nodes will implement.
interface IDirectoryNode
{
    string Name { get; }
    string Description { get; set; }
    void AddNode(IDirectoryNode node);
    void RemoveNode(IDirectoryNode node);
    IDirectoryNode[] GetNodes();
}

//Our Composite node class.
class Folder : IDirectoryNode
{
    string _name;
    List<IDirectoryNode> _nodes = new List<IDirectoryNode>();

    string Name
    {
        get { return _name; }
    }

    string Description
    {
        //This is one way of handling this.
        //we return a null description and the
        //setter does nothing.  We could have
        //thrown an exception among other solutions.
        get { return null; }
        set { }
    }

    public Folder(string name)
    {
        _name = name;
    }

    public void AddNode(IDirectoryNode node)
    {
        _nodes.Add(node);
    }

    public void RemoveNode(IDirectoryNode node)
    {
        _nodes.Remove(node);
    }

    public IDirectoryNode[] GetNodes()
    {
        return _nodes.ToArray();
    }
}

//Now for the leaf nodes.
class File : IDirectoryNode
{
    string _name;
    string _description;

    string Name
    {
        get { return _name; }
    }

    string Description
    {
        get { return _description; }
        set { _description = value; }
    }

    public File(string name, string description)
    {
        _name = name;
        _description = description;
    }

    //These do nothing.
    public void AddNode(IDirectoryNode node) { }
    public void RemoveNode(IDirectoryNode node) { }

    public IDirectoryNode[] GetNodes()
    {
        return null;
    }
}
This is good is the sense that we can create Folders and Files and build our tree but there's not much we can do with it from there. We need a ways to traverse the tree. There are two ways to do this: with a depth-first search where we start at a node and visit all of its children before backtracking or a breadth-first search where we visit all the nodes on the same level before exploring their children.
We will implement both as a way to search for names and descriptions.
First we'll make methods that perform a depth-first search and return a list of nodes that match what we're looking for. We'll be using recursion in this example but there are iterative ways to do it as well. Let's add these new search methods to our interface and classes.
interface IDirectoryNode
{
    string Name { get; }
    string Description { get; set; }
    void AddNode(IDirectoryNode node);
    void RemoveNode(IDirectoryNode node);
    IDirectoryNode[] GetNodes();
    List<IDirectoryNode> SearchForNames(string name);
    List<IDirectoryNode> SearchForDescriptions(string descriptions);
}

class Folder : IDirectoryNode
{
    string _name;
    List&lt;IDirectoryNode&gt; _nodes = new List&lt;IDirectoryNode&gt;();

    string Name
    {
        get { return _name; }
    }

    string Description
    {
        get { return null; }
        set { }
    }

    public Folder(string name)
    {
        _name = name;
    }

    public void AddNode(IDirectoryNode node)
    {
        _nodes.Add(node);
    }

    public void RemoveNode(IDirectoryNode node)
    {
        _nodes.Remove(node);
    }

    public IDirectoryNode[] GetNodes()
    {
        return _nodes.ToArray();
    }

    public List<IDirectoryNode> SearchForNames(string name)
    {
        List<IDirectoryNode> results = new List<IDirectoryNode>();
        foreach (IDirectoryNode node in _nodes)
        {
            string nodeName = node.Name;

            //Some debugging to make sure we're traversing
            //the tree in the correct order.
            Console.WriteLine(
                "Visiting " + nodeName + " " + "the " + node.ToString());

            if (nodeName == name)
            {
                results.Add(node);
            }

            //Here is where we recurse down into the tree.
            results.AddRange(node.SearchForNames(name));
        }
        return results;
    }

    public List<IDirectoryNode> SearchForDescriptions(string description)
    {
        List<IDirectoryNode> results = new List<IDirectoryNode>();

        foreach (IDirectoryNode node in _nodes)
        {
            string nodeDescription = node.Description;

            //Some debugging to make sure we're traversing
            //the tree in the correct order.
            Console.WriteLine(
                "Visiting " + node.Name + " " + "the " + node.ToString());

            if (nodeDescription != null &&
                nodeDescription == description)
            {
                results.Add(node);
            }

            results.AddRange(node.SearchForDescriptions(description));
        }

        return results;
    }
}

class File : IDirectoryNode
{
    string _name;
    string _description;

    string Name
    {
        get { return _name; }
    }

    string Description
    {
        get { return _description; }
        set { _description = value; }
    }

    public File(string name, string description)
    {
        _name = name;
        _description = description;
    }

    //These do nothing.
    public void AddNode(IDirectoryNode node) { }
    public void RemoveNode(IDirectoryNode node) { }

    public IDirectoryNode[] GetNodes()
    {
        return null;
    }

    //These are not applicable so we just
    //return an empty list.
    public List<IDirectoryNode> SearchForNames(string name)
    {
        return new List<IDirectoryNode>();
    }

    public List<IDirectoryNode> SearchForDescriptions(string description)
    {
        return new List<IDirectoryNode>();
    }
}
Let's test this out by building a tree and searching for some things.
class Program
{
    static void Main(string[] args)
    {
        //Building our tree...
        IDirectoryNode documentsFolder = new Folder("Documents");
        IDirectoryNode gamesFolder = new Folder("Games");
        IDirectoryNode musicFolder = new Folder("Music");
        IDirectoryNode someGame = new File("Fun Time Game", "Whooo, fun!");
        IDirectoryNode someSong = new File("Happy Song", "La la la");
        IDirectoryNode textDocument = new File("Journal", "I had a good day!");
        IDirectoryNode textDocumentTwo = new File("Journal", "I had a bad day!");

        documentsFolder.AddNode(gamesFolder);
        documentsFolder.AddNode(musicFolder);
        documentsFolder.AddNode(textDocument);
        gamesFolder.AddNode(someGame);
        musicFolder.AddNode(someSong);
        musicFolder.AddNode(textDocumentTwo);

        //Now we can do searches.
        List<idirectorynode> nameResults = new List<idirectorynode>();
        nameResults = 
            documentsFolder.SearchForNames("Journal");

        foreach (IDirectoryNode node in nameResults)
        {
            Console.WriteLine(node.Name);
        }

        Console.WriteLine();

        List<idirectorynode> descriptionResults = 
            documentsFolder.SearchForDescriptions("La la la");

        foreach (IDirectoryNode node in descriptionResults)
        {
           Console.WriteLine(node.Name);
        }

        Console.ReadLine();
   }
}
As you can see, each child is being completely explored before moving on to the next.
Now let's try to make the breadth-depth search.
We'll be using a queue to keep track of the nodes we still need to explore. Once a node in the queue has been explored, it's removed from line and its children are added. This is repeated until the queue is empty.
This image from wikipedia illustrates the algorithm beautifully.


The grey nodes are the ones currently enqueued and the black nodes are the ones being visited.
For the sake of brevity I will write out just search methods. The interface needs the new stubs as well.
//The breadth-first Folder search implementation.
public List<IDirectoryNode> BreadthFirstNameSearch(string name)
{
    List<IDirectoryNode> result = new List<IDirectoryNode>();
    Queue<IDirectoryNode> searchQueue = new Queue<IDirectoryNode>();

    foreach (IDirectoryNode node in _nodes)
    {
        searchQueue.Enqueue(node);
    }

    while (searchQueue.Count != 0)
    {
        IDirectoryNode currentNode = searchQueue.Dequeue();

        Console.WriteLine(
            "Examining " + currentNode.ToString() + ", " + currentNode.Name);

        if (currentNode.Name == name)
        {
            result.Add(currentNode);                   
        }
        foreach (IDirectoryNode node in currentNode.GetNodes())
        {
            searchQueue.Enqueue(node);
        }
    }

    return result;
}

public List<IDirectoryNode> BreadthFirstDescriptionSearch(string description)
{
    List<IDirectoryNode> result = new List<IDirectoryNode>();
    Queue<IDirectoryNode> searchQueue = new Queue<IDirectoryNode>();

    foreach (IDirectoryNode node in _nodes)
    {
        searchQueue.Enqueue(node);
    }

    while (searchQueue.Count != 0)
    {
        IDirectoryNode currentNode = searchQueue.Dequeue();

        Console.WriteLine(
            "Examining " + currentNode.ToString() + ", " + currentNode.Name);


        if (currentNode.Description != null &&
            currentNode.Description == description)
        {
            result.Add(currentNode);                   
        }

        foreach (IDirectoryNode node in currentNode.GetNodes())
        {
            searchQueue.Enqueue(node);
        }
    }

    return result;
}
Since we cannot search files their implementations simply return empty lists.
If we had used a stack instead of a queue this would have resulting in a depth-first search. Testing this out:
class Program
{
    static void Main(string[] args)
    {
        IDirectoryNode documentsFolder = new Folder("Documents");
        IDirectoryNode gamesFolder = new Folder("Games");
        IDirectoryNode musicFolder = new Folder("Music");
        IDirectoryNode someGame = new File("Fun Time Game", "Whooo, fun!");
        IDirectoryNode someSong = new File("Happy Song", "La la la");
        IDirectoryNode textDocument = new File("Journal", "I had a good day!");
        IDirectoryNode textDocumentTwo = new File("Journal", "I had a bad day!");

        documentsFolder.AddNode(gamesFolder);
        documentsFolder.AddNode(musicFolder);
        documentsFolder.AddNode(textDocument);
        gamesFolder.AddNode(someGame);
        musicFolder.AddNode(someSong);
        musicFolder.AddNode(textDocumentTwo);

        List<IDirectoryNode> nameResults = new List<IDirectoryNode>();
        nameResults = 
            documentsFolder.BreadthFirstNameSearch("Journal");

        foreach (IDirectoryNode node in nameResults)
        {
            Console.WriteLine(node.Name);
        }

        Console.WriteLine();

        List<IDirectoryNode> descriptionResults = 
            documentsFolder.BreadthFirstDescriptionSearch("La la la");

        foreach (IDirectoryNode node in descriptionResults)
        {
            Console.WriteLine(node.Name);
        }

        Console.ReadLine();
    }
}


Notice the different order in which each node is visited.
This is just one very simple way to do this, there are more sophisticated and generalized ways of going about this but the algorithms themselves are the same or very similar.

And this concludes my Design Pattern series (for now)! Next I'll start focusing more on collision algorithms and game physics.
I hope you've enjoyed reading them as much as I have writing them!
Feel free to leave comments, questions, corrections or what have you. Thanks!

The Command Pattern

The Command pattern is way to separate a request for an action to be performed from the object that actually performs the action. It encapsulates method invocation allowing one to parameterize or change the object making the invocation on the fly.
It's also really neat.
First let's look at a very simple situation where we may need something like this.
Let's say we have two types of objects, a glass bottle and I don't know, a wooden box. If we drop the glass bottle it shatters instantly and is gone. The box however can be dropped a few times before breaking.
Let's see how two simple versions of these classes may be set up.
class Bottle
{
    bool _broken = false;

    public void Break()
    {
        if (_broken)
        {
            Console.WriteLine("The bottle is already broken");
        }
        else
        {
            _broken = true;
            Console.WriteLine("The bottle shatters");
        }
    }
}

class Box
{
    bool _broken = false;
    int _hitPoints = 3;

    public void Hit()
    {
        if (_broken)
        {
            Console.WriteLine("The box is broken irreparably.")
        }
        else
        {
            _hitPoints--;
            if (_hitPoints <= 0)
            {
                _broken = true;
                Console.WriteLine("The box breaks.")
            }
        }
    }
}

The methods Hit() and Break() are clearly fairly different from one another other besides the fact that they are both void and parameterless and they are both probably going to called during very similar situations.
So how would a client class have to deal with this? We can set up a very simple situation to demonstrate the problems that arise.
class Program
{        
    static void Main(string[] args)
    {
        Bottle bottle = new Bottle();
        Box box = new Box();
        string input = "";

        while (input.ToLower() != "q")
        {
            Console.WriteLine(
                "Press B to drop the (B)ottle, O to drop the B(o)x or Q to (Q)uit.");
            input = Console.ReadLine();

            if (input.ToLower() == "b")
            {
                bottle.Break();
            }
            else if (input.ToLower() == "o")
            {
                box.Drop();
            }               
        }
    }
}

It works now but this clearly will not do.
The above code is pretty bad on a number of levels. For starters the more objects added that can be dropped, the bulkier and just awful our client class becomes.
Secondly the client class (in this over simplified case it's the Program class) has too many responsibilities: accepting and interpreting user input and responding to the input (that problem specifically I'm not actually going over in this article but it's something to think about). A general design guideline is: one class, one responsibility. Moreover, in some cases our client class may not even have access to Bottles and Boxes as they may be hidden.
The Command pattern helps by introducing a new type of object called a command object which will contain a single method, Execute().
It's not an easy pattern to grasp at first (it wasn't for me anyway) but it's usefulness became apparent once I did.
Before we dive into the code, let's look at a real world analogy that mirrors how the command pattern works.
In a cafe we can can order many different types of beverages and each have a different procedure for making it. We give our drink order to the chashier who writes down the specifics of the drink we want. The slip encapsulates our drink order. It is then passed off to the barrista who interprets what's written on the slip and makes your drink.
You, the customer, know how to order a drink so you create a command (your order) and pass it off to the chashier. The chashier in turn takes the command you created and passes it to the barrista who makes the drink. Most real life cafe cashiers, of course, must also need to know how to prepare a drink, but for our purposes they do not and have completely separate responsibilities.
Now let's look at the various pieces of the pattern and see how they fit into the cafe scenario.
The Command pattern has a client class which is responsible for creating our command objects (the customer), the client then passes the command to the invoker. The invoker contains one or more references to a command objects which the client sets. Now the invoker can invoke one of these commands at any time, which is like having the barrista make the drinks. Since the invoker can call these methods at any time, we can even set up ques of commands to be executed in a certain order.
Moving back to our Box/Bottle issue, let's take a look at some code now to hopefully help gel the whole idea.
Starting with our command interface and objects:
interface ICommand
{
    void Execute();
}

class BottleDropCommand : ICommand
{
    Bottle _bottle;

    public BottleDropCommand(Bottle bottle)
    {
        _bottle = bottle;
    }

    public void Execute()
    {
        _bottle.Break();
    }
}

class BoxDropCommand : ICommand
{
    Box _box;

    public BoxDropCommand(Box box)
    {
        _box = box;
    }

    public void Execute()
    {
        _box.Drop();
    }
}

Now we need our invoker, a sort of item dropping interface to work with. This will hold two ICommand objects that we can execute at any time.
class SimpleItemDropper
{
    //We have two ICommand's at the moment but this can be extended
    //deal with any amount.
    ICommand _commandOne;
    ICommand _commandTwo

    public void SetCommandOne(ICommand command)
    {
        _commandOne = command;
    }

    public void SetCommandTwo(ICommand command)
    {
        _commandTwo = cammand;
    }
    
    //The item dropper doesn't care if it's a box or a bottle, it just
    //executes the set command!
    public void ExecuteOne()
    {
        _commandOne.Execute();
    }

    public void ExecuteTwo()
    {
        _commandTwo.Execute();
    }
}

Now our client class becomes:
class Program
{        
    static void Main(string[] args)
    {
        Bottle bottle = new Bottle();
        Box box = new Box();
        SimpleItemDropper itemDropper = new SimpleItemDropper();

        ICommand dropBottle = new BottleDropCommand(bottle);
        ICommand dropBox = new BoxDropCommand(box);

        itemDropper.SetCommandOne(dropBottle);
        itemDropper.SetCommandTwo(dropBox);

        itemDropper.ExecuteOne();
        itemDropper.ExecuteOne();
        itemDropper.ExecuteTwo();
        itemDropper.ExecuteTwo();
        itemDropper.ExecuteTwo();
        itemDropper.ExecuteTwo();
        itemDropper.ExecuteTwo();
        
        Console.ReadLine();
    }
}
Our output should look something like this:

And that's the Command pattern, a great way to
* encapsulate method invocation
* separate the invocation of a method from the object receiving the invocation request.

There are many more great uses of this pattern as it can do some very clever things. I suggest investigating further and more importantly experimenting with the pattern yourself. This is a very simple (and useless) example and the pattern can be tweaked and extended to your needs (just like any pattern!) but I've successfully conveyed how powerful this pattern is.
Thanks for reading!

Friday, December 9, 2011

The Facade Pattern

The Facade pattern is an incredibly simple pattern. In fact, there's a good chance you've implemented it in your projects before without being aware that you were using a design pattern.
This is a short and simple article, but it is a very useful pattern. The Facade pattern simplifies an interface.
A system can be made up of many classes, with complicated interdependencies, each with their own unique interface.
The Facade pattern is a way to simplify how the client interacts with these objects.
Let's say we have a bunch a classes that control various appliances in the house.
class KitchenLight
{
    public void On()
    {
        Console.WriteLine("Kitchen light on.");
    }
    
    public void Off()
    {
        Console.WriteLine("Kitchen light off.");
    }
}

class LivingRoomLight
{
    public void On()
    {
        Console.WriteLine("Living room light on.");
    }

    public void Off()
    {
        Console.WriteLine("Living room light off.");
    }
}

class TV
{
    int _channel;

    public int Channel
    {
        get { return _channel; }
    }

    public void On()
    {
        Console.WriteLine("TV on.");
    }

    public void Off()
    {
        Console.WriteLine("TV off.");
    }

    public void ChangeChannel(int channel)
    {
        _channel = channel;
    }
}

class DVD
{
    string _name;
    
    public string Name
    {
        get { return _name; }
    }

    public DVD(string name)
    {
        _name = name;
    }
}

class DVDPlayer
{
    TV _tv;
    DVD _dvd;

    public DVDPlayer(TV tv)
    {
        _tv = tv;
    }

    public void On()
    {
        Console.WriteLine("DVD on.");
    }

    public void Off()
    {
        Console.WriteLine("DVD off.");
    }

    public void PlayMovie()
    {
        if (_tv.Channel == 4)
        {
            if (_dvd != null)
            {
                Console.WriteLine("Playing " + _dvd.Name);
            }
            else
            {
                Console.WriteLine("No disc in player.");
            }
        }
        else
        {
            Console.WriteLine("TV must be on channel 4.");
        }
    }

    public void InsertDVD(DVD dvd)
    {
        Console.WriteLine("Inserting " + _dvd.Name);
        _dvd = dvd;
    }    
}
Seems simple but now what if we want to watch a movie? From our client class we'd have to....
class Program
{
    static void Main(string[] args)
    {
        KitchenLight kitchenLight = new KitchenLight();
        LivingRoomLight livingRoomLight = new LivingRoomLight();
        TV tv = new TV();
        DVDPlayer dvdPlayer = new DVDPlayer(tv);
        DVD dvd = new DVD("Memento");

        //We'd have to do all this!
        kitchenLight.Off();
        tv.On();
        tv.ChangeChannel(4);
        dvdPlayer.On();
        dvdPlayer.InsertDVD(dvd);
        livingRoomLight.Off();
        dvdPlayer.PlayMovie();
    }
}
That's a lot just to watch a dvd. And when we're done, we'll have to do the whole thing again in reverse.
And, oh no! We just got an XBox and a new game!
class XBoxGame
{
    string _name;

    public string Name
    {
        get { return _name; }
    }

    public XBoxGame(string name)
    {
        _name = name;
    }
}

class XBox
{
    TV _tv;
    XBoxGame _game;

    public DVDPlayer(TV tv)
    {
        _tv = tv;
    }

    public void On()
    {
        Console.WriteLine("XBox on.");
    }

    public void Off()
    {
        Console.WriteLine("XBox off.");
    }

    public void PlayGame()
    {
        if (_tv.Channel == 4)
        {
            if (_game != null)
            {
                Console.WriteLine("Playing " + _game.Name);
            }
            else
            {
                Console.WriteLine("No game in console.");
            }
        }
        else
        {
            Console.WriteLine("TV must be on channel 4.");
        }
    }

    public void InsertGame(XBoxGame game)
    {
        Console.WriteLine("Inserting " + _game.Name);
        _game = game;
    }    
}
This is getting ridiculous.
Luckily the facade pattern can help. A facade is basically a class that holds all these interconnected classes and knows how to interact with them.
Let's see how.
class HomeApplianceFacade
{
    TV _tv;
    DVDPlayer _dvdPlayer;
    KitchenLight _kitchenLight;
    LivingRoomLight _livingRoomLight;
    XBox _xbox;

    public HomeApplianceFacade(
        TV tv,
        DVDPlayer dvdPlayer,
        KitchenLight kitchenLight,
        LivingRoomLight livingRoomLight,
        XBox xbox)
    {
        _tv = tv;
        _dvdPlayer = dvdPlayer;
        _kitchenLight = kitchenLight;
        _livingRoomLight = livingRoomLight;
        _xbox = xbox;
    }

    public void WatchMovie(DVD dvd)
    {
        kitchenLight.Off();
        tv.On();
        tv.ChangeChannel(4);
        dvdPlayer.On();
        dvdPlayer.InsertDVD(dvd);
        livingRoomLight.Off();
        dvdPlayer.PlayMovie();
    }

    public void FinishedMovie()
    {
        _livingRoomLight.On();
        _dvdPlayer.Off();
        _tv.Off();
        _kitchenLight.On();
    }

    public void PlayGame(XBoxGame game)
    {
        _kitchenLight.Off();
        _tv.On();
        _tv.ChangeChannel(4);
        _xBox.On();
        _xBox.InsertGame(game);
        _livingRoomLight.Off();
        _xBox.PlayGame();
    }

    public void FinishedPlayingGame()
    {
        _livingRoomLight.On();
        _xBox.Off();
        _tv.Off();
        _kitchenLight.On();

    }
}
Now we have a few methods that deal with all the low level classes correctly so we don't have to deal with it every time.
When we want to watch a movie or something we deal directly with the Facade we've created. We can still access the low level stuff if we want to, but the simplified interface is there if we need it.
class Program
{
    static void Main(string[] args)
    {
        //We still have to 'install' our system.
        KitchenLight kitchenLight = new KitchenLight();
        LivingRoomLight livingRoomLight = new LivingRoomLight();
        TV tv = new TV();
        DVDPlayer dvdPlayer = new DVDPlayer(tv);

        //But now we have a facade to handle all the complicated stuff.
        HomeApplianceFacade applianceFacade =
            new HomeApplianceFacade(tv, dvdPlayer, kitchenLight, livingRoomLight, xBox);

        //Our simplified interface.
        applianceFacade.WatchMovie(new DVD("Memento"));
        applianceFacade.FinishedMovie();
        applianceFacade.PlayGame(new XBoxGame("Skyrim"));
        applianceFacade.FinishedPlayingGame();
    }
}
And that's pretty much it! The Facade pattern; a great way to create a unified interface to simplify a complicated subsystem.

Thanks, as always for reading and I hope you enjoyed the article.

Sunday, December 4, 2011

Intersection Testing in 2D

Whether or not you plan on making a game with a fancy physics engine you'll more than likely still have to check for collisions at some point. In games, a collision is generated when two or more pieces of geometry are intersecting. Testing to see if two geometrical figures are in intersection (or sometimes called interpenetration) can be a complicated and expensive task.

In this article I will go over several common shapes in 2 dimensions and investigate how we can test a pair of them for intersection. We will also discuss a general method for testing shapes of a certain class.
Responding to the intersections (and finding them fast) is beyond the scope of this article. This article is concerned only with checking for intersection but is still a pretty large subject.

If you're a little shaky on your mathematics, then I suggest that you refresh yourself thoroughly at least. A good understanding of high school math as well as a lot of college level stuff is integral in the development of games. There's no way around it.
That said, I am not trying to scare you so I will try to be as gentle as possible. The more you do it the easier it gets.

We'll go over the 2D shapes covered briefly then investigate how to test for an intersection between pairs of them.

The Circle


A circle is the set of points in the plane that are the same distance from a common point called its center. This distance from a point in the set to the center is its radius.
We can denote the center of a circle by a point in space with its x and y values, or by a vector and its radius by a real number. Although we'll be working with floats or doubles instead of the infinitude of the reals.
Now we can represent a circle by the equation:
$(x-c_x)^2+(y-c_y)^2=r^2$
Where,
$C = (c_x, c_y)$
is the circle's center point with its x and y components and r is the radius.
Every pair of reals, x and y that satisfy this equation for a given real number, r and a point C, is a point on the (unique) circle of radius, r centered at, C.


We can represent a circle simply by storing its position and radius into memory.
class Circle
{
    public Vector2 Center;
    public float Radius;
}

Rectangle


We'll be dealing with two kinds of rectangles here, axis-aligned, often called bounding boxes and non-axis-aligned. When we're referring to the axis-aligned situation we'll specifically say so, otherwise we'll just say 'rectangle' or 'box'.


Axis-aligned boxes have each of their edges parallel to the coordinate axis while the regular boxes do not.
The built-in Rectangle structure that comes with XNA is axis-aligned.
Many calculations become much simpler when we're dealing with rectangles that are axis-aligned but we'll be looking at both cases.
An axis-aligned box simply has a location (usually referring to the upper-left corner), a width and a height. No other information is needed to describe the bounding box.
class AxisAlignedBox
{
    public Vector2 Position;
    public float Width;
    public float Height;
}
In the other case we need to store a position, a width, a height and an angle of rotation.


Here, P is the position and,
$\theta$
(pronounced 'theta') is the angle. A positive angle is measured counter-clockwise.
In XNA, by default the origin is the upper-left hand corner of the sprite we're rotating but we'll normally be rotating a box about it's center or perhaps it's center of mass. We'll see how to deal with these things later on.

Other Polygons


There are many different polygons and the only ones we'll look at in any depth are the convex polygons. This is where it get very complicated very quickly and we'll briefly discuss a general method of testing.

Circle-circle test


Two circles in the plane don't intersect if the distance between their centers is greater than the sum of their radii. That is,

$d(c1, c2) = \sqrt{(c1_x-c2_x)^2+(c1_y-c2_y)^2} > r1+r2$

d(c1, c2) is the distance between the centers and c1 and c2 are the centers subscripted by their x or y component.

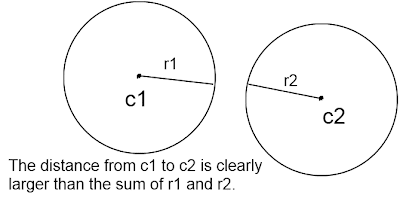
The distance from center to center is larger than their combined radii.  No intersection.
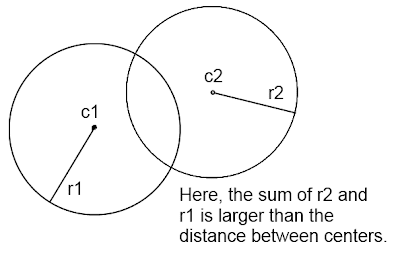
The distance between their centers is smaller than the sum of their radii, hence, they intersect.

To avoid expensive square root computations we usually compare the square of the distance to the square of the sum of the radii since the inequality remains true.
$(c1_x-c2_x)^2+(c1_y-c2_y)^2 >(r1+r2)^2$
the above is true if the circles don't touch.
Adding this to our Circle class,
class Circle
{
    public Vector2 Center;
    public float Radius;

    //Returns true if this circle intersects another
    //or they are 'just touching'.
    public bool Intersects(Circle circle)
    {
        Vector2 center1 = Center;
        Vector2 center2 = circle.Center;
        float radius1 = Radius;
        float radius2 = circle.Radius;

        float distanceSquared = 
            (float)Math.Pow((center1.X - center2.X), 2) +
            (float)Math.Pow((center1.Y - center2.Y), 2);
        float sumOfRadiiSquared = (float)Math.Pow(radius1 + radius2, 2);
        
        if (distanceSquared <= sumOfRadiiSquared)
        {
            return true;
        }
        else
        {
            return false;
        } 
    }
}

Box-box test (axis aligned)


The test for two axis-aligned boxes is fairly straight forward. We'll need to add a few properties to our class first though,
class AxisAlignedBox
{
    public Vector2 Position;
    public float Width;
    public float Height;

    //y value of uppermost side.
    public float Top
    {
        get { return Position.Y; }
    }

    //y value of lowest side.
    public float Bottom
    {
        get { return Position.Y + Height; }
    }

    //x value of left most side.
    public float Left
    {
        get { return Position.X; }
    }
    
    //x value of right most side.
    public float Right
    {
        get { return Position.X + Width; }
    }
}
The basic idea is that is if the rectangles intersect, then the top side of one (or the bottom side) will be within the bounds set by the top and bottom sides of the other rectangle. Likewise the left side of one (or the right side) will be within the bounds set by the left and right sides of the other rectangle.
Take a look at this picture.


Here, we are testing three different rectangles against the shaded rectangle we'll call, R.
The bottom side of A is below the top side of R and above the bottom side of R, ie. the bottom side of A is within the bounds set by the top and bottom sides of R.  Both the left and right sides of A are within the left-right bounds of R. Even though the top side of A is not within the top-bottom bounds, it still intersects.
For B, the top side is within the top and bottom bounds of R and the left side is within R's left and right bounds.
C, while its right side is within the left-right bounds of R, neither it's top nor its bottom sides are within the proper top-bottom bounds of R and it doesn't intersect.
Take a look at the follow case, though.

Rectangle D clearly intersects, but neither it's top nor bottom is within the top-bottom range of R.  However, both the top and bottom of R are in D's top-bottom range.
So, roughly in logical terms,
(bottom OR top is within top-bottom bounds of one OR the same with the other) AND
(left OR right is within left-right bounds of one OR the same with the other).
We're pretty much ready to write our algorithm.

class AxisAlignedBox
{
    public Vector2 Position;
    public float Width;
    public float Height;

    //y value of uppermost side.
    public float Top
    {
        get { return Position.Y; }
    }

    //y value of lowest side.
    public float Bottom
    {
        get { return Position.Y + Height; }
    }

    //x value of left most side.
    public float Left
    {
        get { return Position.X; }
    }
    
    //x value of right most side.
    public float Right
    {
        get { return Position.X + Width; }
    }

    public bool Intersects(AxisAlignedBox box)
    {
        bool areBottomsInBounds =
            (Bottom >= box.Top && Bottom <= box.Bottom) ||
            (box.Bottom >= Top && box.Bottom <= Bottom);

        bool areTopsInBounds =
            (Top >= box.Top && Top <= box.Bottom) ||
            (box.Top >= Top && box.Top <= Bottom);

        bool areLeftsInBounds =
            (Left >= box.Left && Left <= box.Right) ||
            (box.Left >= Left && box.Right <= Right);

        bool areRightsInBounds =
            (Right >= box.Left && Right <= box.Right) ||
            (box.Right >= Left && box.Right <= Right);

        bool intersects = (areBottomsInBounds || areTopsInBounds) &&
            (areLeftsInBounds || areRightsInBounds);


        return intersects;
    }
}
Another, way to do this which will also be enlightening later on is to note that for rectangle A in the above illustration, the distance from the top of A to the bottom of R is less than the sum of the height of A and the height of R, while at the same time, the distance between the left of A and the right of R is less than the sum of the width of A and width of R. In general, the distance between the uppermost and lowermost points is less than the sum of the heights and the distance between the leftmost and rightmost points is less than the sum of the widths.
The code for the other method,
class AxisAlignedBox
{
    public Vector2 Position;
    public float Width;
    public float Height;

    //y value of uppermost side.
    public float Top
    {
        get { return Position.Y; }
    }

    //y value of lowest side.
    public float Bottom
    {
        get { return Position.Y + Height; }
    }

    //x value of left most side.
    public float Left
    {
        get { return Position.X; }
    }
    
    //x value of right most side.
    public float Right
    {
        get { return Position.X + Width; }
    }

    public bool Intersects(AxisAlignedBox box)
    {
        //The nested Max calls find the maximum of four different values.
        //Similarly with the nested Min values we find the minimum of more than two values.
        float horizontalDistance = Math.Max(Right, 
                                       Math.Max(box.Right, 
                                           Math.Max(Left, box.Left))) - 
                                   Math.Min(Right, 
                                       Math.Min(box.Right, 
                                           Math.Min(Left, box.Left)));
        float verticalDistance =  Math.Max(Top, 
                                      Math.Max(box.Top, 
                                          Math.Max(Bottom, box.Bottom))) - 
                                  Math.Min(Top, 
                                      Math.Min(box.Top, 
                                          Math.Min(Bottom, box.Bottom)));

        bool intersects = (float)Math.Abs(horizontalDistance) <= Width + box.Width &&
                          (float)Math.Abs(verticalDistance) <= Height + box.Height
     
        return intersects;       
    }
}

Box-box test (general)

Before continuing further we need to talk about an important mathematical theorem called the separating axis theorem. We've already used a result of this theorem in the last example and it will end up being the basis for many other intersection problems in the future. We'll go into the theorem in some depth, what it implies and how we can use it to test for intersections.

The Separating Axis Theorem


The separating axis theorem states that two convex polygons do not intersect if and only if there exists a line such that when we project the shapes onto that line, the projections do not overlap. The line we project onto is called the axis of separation.

First let's clear up the term "projection onto a line".
The term, projection seems a little overloaded with definitions but they are all closely related.
In our case, we can say informally that we're 'casting a shadow' of the object onto a line.
This picture illustrates three shapes being projected onto an arbitrary line, the x-axis and the y axis.
Here we see three shapes being projected onto three lines:  The x and y axis and an arbitrary line, L.
The projections are regions of the line. Notice shape C is an axis-aligned box; its x and y projections are the same left-right and top-bottom bounds that we used earlier. In fact, the term in the conditional that states the box we're testing must have its bottom OR top side within the top-bottom bound of the other box is analogous to saying that the boxes' projections onto the y-axis overlap (look at the illustration from the axis aligned box-box section to make sure you see why).
None of these shapes intersect so according to the theorem, there exists a line such that the shapes projections onto that line are separate. Here we see two: the x-axis and the line, L.
This theorem says a lot about when shapes don't intersect but what can we say about when they do? Well, we simply have to negate the theorem to see that two convex polygons intersect if and only if there does not exit a line with said properties. That is, no matter how many lines you project your polyhedra onto, the projections will always overlap.
This poses a problem since there are infinitely many lines we could check.
Luckily in the case of convex polygons there are only a few axis we need to check.
Notice in the axis-aligned box-box method, we only checked the projections of two lines: the x and the y axis. Since both boxes were aligned to those axis those were the only two we had to check.
For a convex polygon, it is sufficient to check the shapes against the axis determined by the normals of each edge (source). If we come across projections that don't overlap we have an early out which will speed up the calculation and if we get through them all and all the projections overlap, then the shapes intersect.
Once we have projections (or the length of them) we can check to see if they overlap similarly to the axis aligned case above.

Before we checked the total distance between the uppermost or lowermost points against the sum of the widths or heights depending.
Now we're checking the distance between the extreme points of the projections along the axis and testing that against the sum of the lengths of the projections. But how do we project these polygons against an axis and find these lengths to begin with?

To start, we'll need to know about vector projection.
The projection of $\bar{a}$ onto $\bar{b}$ is,
$(\bar{a}\cdot\bar{b})\bar{b}=(|\bar{a}|\cos{\theta})\bar{b}$
This can be thought of as the "$\bar{b}$ component of $\bar{a}$". It's in the direction of $\bar{b}$ with a magnitude that varies between $|\bar{a}|$ (when $\bar{a}$ is parallel to $\bar{b}$) and 0 (when $\bar{a}$ is normal to $\bar{b}$).
We also need to tweak our Box class a bit. A lot of the math becomes easier when we keep track of the box's center, its half-height and its half-width. These are similar to a circle's radius except they're vector quantities.


class Box
{
    //Pseudo-code...
    public Vector2 Center;
    public Vector2 HalfHeight;
    public Vector2 HalfWidth;
    public float Angle;
}
Now to measure a projection along a certain axis, take a look at the following illustration,

The half-width and half-height projections give us a handy way to measure a shape along an axis. As for the total distance we need only to project the distance between centers onto the axis and find that length. This give us half the total distance. So we can check the length of the projected vectors against that.

To sum up the algorithm we've been piecing together so far:
1. Get the normals of each box, removing duplicates and normals in the opposite direction.
For each normal:
2. Project both of the boxes' half-widths and half-heights onto it and find the sum of their lengths (note: not the length of their sum, since the projections point in opposite directions they tend to cancel eachother). We'll call these H1 and H2 for each box.
3. Project the difference vector of the boxes' centers onto the normal and find its length, we'll call it D.
4. if D > H1 + H2, then there's no overlap, hence no intersection. Otherwise:
5. if there's more normals get the next normal and repeat. Otherwise, all projections overlap and we have an intersection!
And now we're ready to take a look at our new Box class with the interection method.
class Box
{
    public Vector2 Center;
    //We store these as floats for now,
    //we only need the vector versions during
    //intersection testing.
    public float HalfWidth;
    public float HalfHeight;
    public float Angle;

    public bool Intersects(Box box)
    {
        //Transform the half measures
        Vector2 halfWidthVectOne = Vector2.Transform(
            HalfWidth * Vector2.UnitX, Matrix.CreateRotationZ(Angle));
        Vector2 halfHeightVectOne = Vector2.Transform(
            HalfHeight * Vector2.UnitY, Matrix.CreateRotationZ(Angle));
        Vector2 halfWidthVectTwo = Vector2.Transform(
            box.HalfWidth * Vector2.UnitX, Matrix.CreateRotationZ(box.Angle));
        Vector2 halfHeightVectTwo = Vector2.Transform(
            box.HalfHeight * Vector2.UnitY, Matrix.CreateRotationZ(box.Angle));
            
        //They'll work as normals too.
        Vector2[] normals = new Vector2[4];
        normals[0] = halfWidthVectOne;
        normals[1] = halfWidthVectTwo;
        normals[2] = halfHeightVectOne;
        normals[3] = halfHeightVectTwo;

        for (int i = 0; i < 4; i++)
        {
            normals[i].Normalize();

            //Project the half measures onto the normal...
            Vector2 projectedHWOne =
                Vector2.Dot(halfWidthVectOne, normals[i]) * normals[i];
            Vector2 projectedHHOne =
                Vector2.Dot(halfHeightVectOne, normals[i]) * normals[i];
            Vector2 projectedHWTwo =
                Vector2.Dot(halfWidthVectTwo, normals[i]) * normals[i];
            Vector2 projectedHHTwo =
                Vector2.Dot(halfHeightVectTwo, normals[i]) * normals[i];

            //Calculate the half lengths along the separation axis.
            float halfLengthOne = projectedHWOne.Length() + projectedHHOne.Length();
            float halfLengthTwo = projectedHWTwo.Length() + projectedHHTwo.Length();

            //Find the distance between object centers along the separation axis.
            Vector2 difference = (Center - box.Center);
            Vector2 projectedDiff =
                Vector2.Dot(difference, normals[i]) * normals[i];
            float projectedDistance = projectedDiff.Length();
            
            //Test for early out.
            if (projectedDistance > halfLengthOne + halfLengthTwo)
            {
                return false;
            }
        }
        //We tested every normal axis,
        //we must be in intersection!
        return true;
    }
}
This test secretly assumes that the rotation is about the center point. Otherwise, we'd need to transform the centers to account for the rotation about a different point. If we were dealing with an origin that was located in the upper-left corner of the box, for example, we'd translate the position by the rotated half-measures to get the correct center.
Also, while we were able to remove a few normals because we knew they were boxes (the ones in the opposite direction as another), we did not go through and test for duplicates. For larger polygons with more normals it may be faster to filter out the duplicate normals.

Circle-box test


For convex polygons there are a finite, if not very large number of normals to check. For a circle one could say there are an infinite amount of normals to check. On the plus side, if we can find a sufficient amount of normals to check, the projection is always the same.
Using the same source, we're going to implement the 'naive' axis test where we test against every axis determined by the circles center and a vertex on the box.
Ideally we would only need to check against the one determined by the closest vertex.
Adding a new method to our Box class,
public bool Intersects(Circle circle)
{
    //Transform the half measures
    Vector2 halfWidthVect = Vector2.Transform(
        HalfWidth * Vector2.UnitX, Matrix.CreateRotationZ(Angle));
    Vector2 halfHeightVect = Vector2.Transform(
        HalfHeight * Vector2.UnitY, Matrix.CreateRotationZ(Angle));

    Vector2[] normals = new Vector2[6];
    normals[0] = halfHeightVect;
    normals[1] = halfWidthVect;
    normals[2] = circle.Center - (Center + halfHeightVect);
    normals[3] = circle.Center - (Center - halfHeightVect);
    normals[4] = circle.Center - (Center + halfWidthVect);
    normals[5] = circle.Center - (Center - halfWidthVect);

    for (int i = 0; i < 6; i++)
    {
        normals[i].Normalize();
        Vector2 projectedHalfWidth =
            Vector2.Dot(halfWidthVect, normals[i]) * normals[i];
        Vector2 projectedHalfHeight =
            Vector2.Dot(halfHeightVect, normals[i]) * normals[i];

        float halfLength = projectedHalfHeight.Length() + projectedHalfWidth.Length();

        Vector2 difference = Center - circle.Center;
        Vector2 projectedDifference =
            Vector2.Dot(difference, normals[i]) * normals[i];
        float projectedDistance = projectedDifference.Length();

        if (projectedDistance > halfLength + circle.Radius)
        {
            return false;
        }
    }
    return true;
}
I also added a method in the Circle class,
public bool Intersects(Box box)
{
    return box.Intersects(this);
}
When I tested this I needed to set the box's origin properly:
protected override void Draw(GameTime gameTime)
{
    GraphicsDevice.Clear(Color.CornflowerBlue);

    Color color = circle.Intersects(rotatedBoxTwo)||circle.Intersects(rotatedBoxOne) ? 
        Color.Red : Color.White;


    spriteBatch.Begin();

    Vector2 scaleOne = new Vector2(
        rotatedBoxOne.Width / (float)boxTexture.Width,
        rotatedBoxOne.Height / (float)boxTexture.Height);
    Vector2 scaleTwo = new Vector2(
        rotatedBoxTwo.Width / (float)boxTexture.Width,
        rotatedBoxTwo.Height / (float)boxTexture.Height);

    float circleScale = 2f* circle.Radius / (float)circleTexture.Width;

    //Remembering the origin is in texture coordinates, we must scale it down.
    spriteBatch.Draw(
        boxTexture,
        rotatedBoxOne.Center,
        null,
        color,
        rotatedBoxOne.Angle,
        new Vector2(rotatedBoxOne.HalfWidth, rotatedBoxOne.HalfHeight) / scaleOne,
        scaleOne,
        SpriteEffects.None,
        0f);

    spriteBatch.Draw(
        boxTexture,
        rotatedBoxTwo.Center,
        null,
        color,
        rotatedBoxTwo.Angle,
        new Vector2(rotatedBoxTwo.HalfWidth, rotatedBoxTwo.HalfHeight) / scaleTwo,
        scaleTwo,
        SpriteEffects.None,
        0f);

    spriteBatch.Draw(
        circleTexture,
        circle.Center,
        null,
        color,
        0f,
        new Vector2(circle.Radius, circle.Radius) / circleScale,
        circleScale,
        SpriteEffects.None,
        0f);
                
    spriteBatch.End();

    base.Draw(gameTime);
}
I hope this cleared a lot of stuff up about intersections between shapes. Again, if you're intersested, check out this page for more information. There's algorithms about some convex shapes too.
Thanks for reading!

Saturday, December 3, 2011

The Adapter Pattern

In this post we'll the talking about the Adapter Pattern.
The Adapter pattern, in short, makes one class look like another. We've all seen adapters in the real world: many electrical plugs in the U.S. have three prongs while many of the older outlets or extension cords only have two slots for it. We'd still like to be able to use them, after all there's still a plug, an outlet and they both are made for running an electrical current through it.

To get around this we can buy an adapter for the plug. It's got three slots on one side and two prongs in the other. We simply plug it into the adapter and the outlet will accept it.

Let's say there's a client class that expects a certain type of object to work but we want to use an object of a type that, while similar, just doesn't fit. All we have to do is write an adapter for it and pass our client the adapter in place of our original class and we're set. The adapter sits in between the client and the vendor class and acts as sort of a translator between the two.

Let's take a look at some simple classes to illustrate. Going back to car examples...
//First we'll need a Vehicle interface.
interface Vehicle
{
    void TurnOn();
    void TurnOff();
    void Drive();
    void FillGasTank();
}

class Car : Vehicle
{
    public void TurnOn()
    {
        Console.WriteLine("Starting ignition.")
    }

    public void TurnOff()
    {
        Console.WriteLine("Shutting off engine.")
    }

    public void Drive()
    {
        Console.WriteLine("Vroom!");
    }

    public void Break()
    {
        Console.WriteLine("Screetch!");
    }

    public void FillGasTank()
    {
        Console.WriteLine("Filling tank.");
    }
}
Now let's say we have a client class with methods that accepts vehicles.
class VehicleTester
{
    public void TestVehicle(Vehicle vehicle)
    {
        vehicle.TurnOn();
        vehicle.Drive();
        vehicle.Break();
        vehicle.FillGasTank();
        vehicle.TurnOff();
    }
}
Seems like a fine vehicle tester but let's take a look at another class, a LawnMower.
class LawnMower
{
    public void TurnOn()
    {
        Console.WriteLine("Pulling cord to start engine.")
    }

    public void TurnOff()
    {
        Console.WriteLine("Push off button");
    }

    public void Push()
    {
        Console.WriteLine("Pushing mower around.");
    }

    public void FillGasTank()
    {
        Console.WriteLine("Filling the tank");
    }
}
We would like to be able to test our new LawnMower with the tester we've already implemented but we shouldn't inherit from Vehicle. It's not exactly a vehicle and there's no Break method.
We could write a separate TestMower method, but that's more coding and there will be code duplication. And if we come up with similar classes in the future that we'd like to test, the code will become messy and confusing quickly as we add these tester methods.

We can fix this by making a class called an adapter which will inherit from the target interface and hold a reference to the object we are adapting. In the adapter's overridden methods, we simply call the corresponding methods on the adaptee.
Let's look at the adapter code to help illustrate.
//The adapter inherits the Vehicle class so that our 
//VehicleTester class method will accept it as a parameter
class LawnMowerAdapter : Vehicle
{
    //The adapter contains a LawnMower reference.
    LawnMower _mower;

    //The constructor is passed a LawnMower to adapt.
    public LawnMowerAdapter(LawnMower mower)
    {
        _mower = mower
    }

    //The adapter must implement all the Vehicle methods
    //and there we'll call the appropriate methods on the mower.
    public void TurnOn()
    {
        _mower.TurnOn();
    }

    public void TurnOff()
    {
        _mower.TurnOff();
    }

    public void Drive()
    {
        _mower.Push()
    }

    public void Break()
    {
        //Traditional lawn mowers don't have a break, you just stop pushing.
        //This method can be left blank.
        //One could code some logic for stopping however this would
        //increase the coupling between Adapter and LawnMower. 
    }

    public void FillGasTank()
    {
        _mower.FillGasTank();
    }
}
Now if we have a VehicleTester that we'd like to use to test our LawnMower, we have a neat way to do that. With an adapter.
We first create the adapter giving it the mower we want to test, then we pass the adapter object off to the VehicleTester's TestVehicle method, who accepts it happily since the adapter implements the Vehicle interface. It tests the Mower with no problems or even the knowledge that it's really dealing with a LawnMower (wrapped in an adapter).

The adapter links the client, the VehicleTester, to the adaptee, the LawnnMower. It does this by tricking the client into thinking that it's dealing with the target when it's really just calling methods on the adaptee.

Which methods being called is completely up the adapter. It acts as a translator for the client.

Let's see this in action
public class Program
{
    public void Main(string[] args)
    {
        VehicleTester tester = new VehicleTester();

        //Create the car.
        Car car = new Car();
        
        //Test the car.
        tester.TestVehicle(car);

        //We now create the LawnMower.
        LawnMower mower = new LawnMower();

        //Although we'd like to we can't do this:
        //tester.TestVehicle(mower);
        
        //so we create an adapter object.
        //passing the mower to its constructer.
        LawnMowerAdapter adapter = new LawnMowerAdapter(mower);

        //Now we can test it via the adapter.
        tester.TestVehicle(adapter);
    }
}
Now the console should print something like this out:

Starting ignition.
Vroom!
Screetch!
Filling tank.
Shutting off engine.
Pulling cord to start engine.
Pushing mower around.
Filling the tank.
Push off button.

Perfect!
The Adapter pattern, turning one class into another.

We'll wrap up with a quick look at the class diagram.


That's all for now. Hope you enjoyed learning about the adapter pattern and thanks for reading.

Thursday, December 1, 2011

The Template Method Pattern

The Template Method patter is a simple but very widely used pattern. In fact, if you ever used the XNA framework, you took advantage of the fact that XNA implements a variation of the Template Method pattern perhaps without even being aware of it!
The Template Method pattern allows us to encapsulate algorithms while also being able to delegate some of the steps of the algorithm to subclasses
Before we see how though, let's look at a simple example.

Many of us love our pets or plants and we have to take care of them. One of the responsibilities is feeding them.
An algorithm for feeding a dog may simply involve getting a can of dog food, opening the can and scooping the contents into a bowl.
Feeding a cat could be quite similar. One could get a can of cat food, open the can and scoop it into a bowl.

Let's build some pet-owner classes and see how this might work.
class DogOwner
{
    public void FeedDog()
    {
        CallDogOver();
        GetDogFood();
        GetCanOpener();
        OpenCan();
        FillBowl();
    }

    void CallDogOver()
    {
        Console.WriteLine("Calling dog's name.")
    }

    void GetDogFood()
    {
        Console.WriteLine("Getting a can of dog food.");
    }
    
    void GetCanOpener()
    {
        Console.WriteLine("Getting a can opener");
    }

    void OpenCan()
    {
        Console.WriteLine("Opening can.");
    }
    
    void FillBowl()
    {
        Console.WriteLine("Empty can into bowl.");
    }
}

class CatOwner
{
    public void FeedCat()
    {
        //These two methods have different implementations
        //Depending on the pet!
        CallCatOver();
        GetCatFood();
        //All of these methods are the same as
        //the DogOwner's...
        GetCanOpener();
        OpenCan();
        FillBowl();
    }

    void CallCatOver()
    {
        Console.WriteLine("Making a ticking noise to get the cat's attention.");
    }

    void GetCanOpener()
    {
        Console.WriteLine("Getting a can opener");
    }

    void GetCatFood()
    {
        Console.WriteLine("Getting a can of cat food.");
    }

    void OpenCan()
    {
        Console.WriteLine("Opening can.");
    }
    
    void FillBowl()
    {
        Console.WriteLine("Empty can into bowl.");
    }
}
A big red flag that a design needs to be reworked is code duplication. For the methods that are the same regardless of pet, we're copying the exact same code into the methods; both involve getting a can opener, opening the can and pouring the contents into a bowl and we should to do something about this duplication.
Even the methods that have different implementations are similar: we still get the pet's attention and retrieve some sort of food.
What we'd like is a framework that allows us to avoid code duplication while also allowing for different implementations on some of the methods in the algorithm. The Template Method pattern allows us to do just that.

Following one of our guidelines to program to an interface (or abstract class), let's rework this a little and code an abstract PetOwner class like so,
abstract class PetOwner
{
    //This is called the Template Method.
    public void FeedPet()
    {
        //These are the steps in the algorithm.
        CallPet();
        GetCanOfFood();
        GetCanOpener();
        OpenCan();
        FillBowl();
    }

    //We delegate the implementation of these methods to
    //any class that inherits from it.
    protected abstract void CallPet();
    protected abstract void GetCanOfFood();

    void GetCanOpener()
    {
        Console.WriteLine("Getting a can opener");
    }

    void OpenCan()
    {
        Console.WriteLine("Opening can.");
    }
    
    void FillBowl()
    {
        Console.WriteLine("Empty can into bowl.");
    }
}
Now any class that inherits from PetOwner must implement both the CallPet and GetCanOfFood methods. The subclasses will be responsible for handling these.

Let's code our DogOwner and CatOwner classes now.
class DogOwner : PetOwner
{
    protected override CallPet()
    {
        Console.WriteLine("Calling the dog's name.");
    }

    protected override GetCanOfFood()
    {
        Console.WriteLine("Getting dog food.");
    }
}

class CatOwner : PetOwner
{
    protected override CallPet()
    {
        Console.WriteLine("Making a ticking noise to get the cat's attention.");
    }

    protected override GetCanOfFood()
    {
        Console.WriteLine("Getting cat food.");
    }
}
This seems to be working out well! But what about a gerbil? (for our example gerbil food now comes in tin cans. No analogy is perfect after all!) One doesn't need to get their attention to eat, one simply fills their bowl. But there's still enough similarities so that we should be able to feed a gerbil with our design.

We can do this by making what's called a hook. A hook is simply a virtual method that by default does nothing but subclasses can hook into it and implement their own behavior if they want to.
Changing the PetOwner class just a little:
abstract class PetOwner
{
    public void FeedPet()
    {
        CallPet();
        GetCanOfFood();
        GetCanOpener();
        OpenCan();
        FillBowl();
    }

    //CallPet is now a hook method.
    protected virtual void CallPet() { }
    protected abstract void GetCanOfFood();

    void GetCanOpener()
    {
        Console.WriteLine("Getting a can opener");
    }

    void OpenCan()
    {
        Console.WriteLine("Opening can.");
    }
    
    void FillBowl()
    {
        Console.WriteLine("Empty can into bowl.");
    }
}
Now CallPet is virtual and by default does nothing. We don't have to change our CatOwner or DogOwner classes at all but in our GerbilOwner class we simply do not have to override it.
class GerbilOwner : PetOwner
{
    protected override GetCanOfFood()
    {
        Console.WriteLine("Getting gerbil food.");
    }
}
We don't need to override the hook method since it's in a cage, probably, and knows exactly when you're about to feed it.

Let's add one more hook to this example so that we can pet the animal after feeding.
abstract class PetOwner
{
    public void FeedPet()
    {
        CallPet();
        GetCanOfFood();
        GetCanOpener();
        OpenCan();
        FillBowl();
        PetAnimal();
    }

    //hooks can be overriden if desired.
    protected virtual void CallPet() { }
    protected virtual void PetAnimal() { }

    //abstract methods must be implemented
    protected abstract void GetCanOfFood();

    void GetCanOpener()
    {
        Console.WriteLine("Getting a can opener");
    }

    void OpenCan()
    {
        Console.WriteLine("Opening can.");
    }
    
    void FillBowl()
    {
        Console.WriteLine("Empty can into bowl.");
    }
}
Now our pet owner classes can pet their animals after feeding if they want to.
class DogOwner : PetOwner
{
    protected override CallPet()
    {
        Console.WriteLine("Calling the dog's name.");
    }

    protected override GetCanOfFood()
    {
        Console.WriteLine("Getting dog food.");
    }

    protected override PetAnimal()
    {
        Console.WriteLine("Petting dog on the the head and scratches behind the ears.");
    }
}

//A fish doesn't need to be called
//And petting one isn't pleasant for you or the fish...
class FishOwner
{
    //Again, for our limited example, fish food comes in cans. (gross)
    protected override GetCanOfFood()
    {
        Console.WriteLine("Getting gerbil food.");
    }
}
The Template Method pattern is arguably the simplest and most widely used pattern around. I mentioned how XNA uses it? Well maybe it's apparent to you how by now but let's consider this.
When you make a new Game project, we automatically get a Game1 class which contains methods for loading content, Updating and Drawing.
Underneath the hood there is an algorithm that first calls Initialize() and LoadContent(), and then a game loop which cycles through the Update() and Draw() methods until the game exits.
The pseudo code might look something very similar to this:
class Game
{
    public void Run()
    {
        Initialize();
        LoadContent();

        //do game loop until we exit the game.
        Update();
        Draw();
    }

    //In this version of the Template Method they're all hooks!
    virtual void Initialize() { }
    virtual void LoadContent() { }
    virtual void Update() { }
    virtual void Draw() { }
}
The same thing applies to GameComponent and DrawableGameComponent.
The methods you see when you first start a game aren't the only hook methods your game can hook into as well, just put your cursor somewhere in the class (but outside a method). And type in 'override'. You'll see a whole slew of things you can override and handle in your own way. Many have default behaviors (called using the base keyword) so watch out for that if you start getting bugs.

That covers the Template Method pattern, a simple but powerful pattern that encapsulates the steps of an algorithm while being able to delegate some of those steps in the algorithm to subclasses.
There are, of course, many variations of the pattern that may not even quite resemble what I've shown you but the idea and purpose is always the same

Hope you enjoyed the article!